December 22, 2010

Christmas Trees with Chocolate Orange Cream

IMG_7738
If you're looking to add an unforgettable dessert to your holiday feast this year, I urge you to give these delightful little Christmas Trees a go!

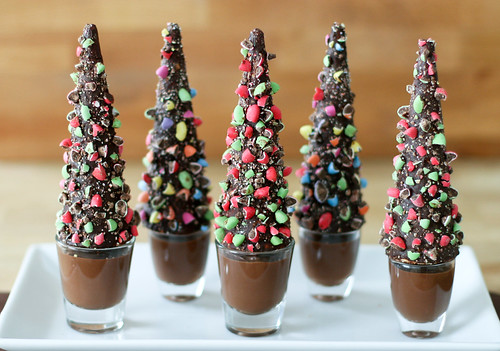
With their colourful appearance and festive charm, these desserts are sure to be a memorable addition to any holiday table.

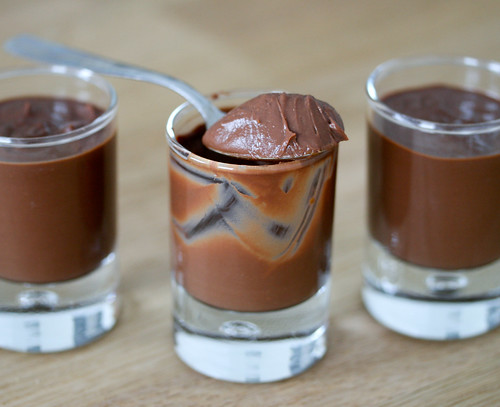
The glasses are filled with a rich, velvety chocolate orange cream and are topped with dark chocolate covered sugar cones and crushed Smarties.

Feel free to dress the cones in whatever style, colour or flavour you please.  White chocolate and crushed peppermint candies would make for a deliciously festive tree! Or how about milk chocolate and crushed hazelnuts, almonds or pistachios?


The chocolate cream is versatile too.  I love the subtle hint of orange zest,  but mint extract, coffee liqueur or a pinch or two of cayenne pepper are all wonderful additions.


IMG_7808-2


Onto a slightly different note: A few months ago, I told you I was working on a 'special creation'. Well it turns out that it might be ready a little earlier than expected.  I have been informed by my doctor that the timer could go off at any moment! I am tired, anxious, excited, curious but more importantly; I am ready.  It has been almost nine months after all!  ; )

Have fun, stay warm and happy baking!


Christmas Trees with Chocolate Orange Cream
Adapted from Verrines by Jose Marechal

Chocolate Orange Cream:
Fills approximately 10-12 small glasses

300ml heavy pouring cream
200ml milk
70g caster sugar
6 egg yolks
200g good quality dark chocolate, roughly chopped
Finley grated zest of one orange

Heat the milk and cream together in a saucepan over a low heat to just below boiling point. Remove from the heat.

Whisk the sugar and egg yolks together in a bowl and then add to the hot cream, stirring constantly. Return the pan to a low heat and stir until the mixture thickens enough to coat the back of wooden spoon. Remove from the heat and add the dark chocolate and orange zest.  Stir until smooth.  Fill the glasses with the cream and refrigerate for at least two hours or preferably overnight.

Chocolate Trees:
8-12 ice cream cones
200g dark chocolate, roughly chopped
Crushed Smarties to decorate

Place the dark chocolate in a heatproof bowl over a pan of barely simmering water. Stir until melted and smooth.

Starting with one at a time, paint the cones with the melted chocolate using a pastry brush and leave for 30 seconds or so before sticking on the Smarties. Repeat with remaining cones and refrigerate for 10 minutes or for up to 24 hours.


December 12, 2010

Sweet Chilli Jam

IMG_7531A
Are you knee deep in the holiday spirit yet? Are you ready to eat yourself into a festive coma? Are you already anticipating the arrival of unwanted guests? Are you sick and tired of standing in line for hours on end? Do you have your menu planned, your cards sent, your presents bought? Oh the pressure!


Whether you're suffering from festive fever or reveling in it, I'm pretty sure todays recipe will knock your stockings off!

Seriously, if you're looking to impress your friends, colleagues or loved ones with a special gift this year then look no further! This tasty homemade chilli jam is guaranteed to make folks happy.

Deliciously sweet yet wonderfully spicy, this jam is crawling with flavour and versatility. It's great with everything from robust cheeses and cold meats to grilled sausages or roast chicken. It's also pretty fantastic spread on hot buttered toast!

And did I mention that it's incredibly easy to make! A few hours of chopping, mixing and simmering and voila! People think you are a jam making queen! Or king?!


 Do use caution when chopping though as these little red chillies are.....


IMG_7039-2


Sweet Chilli Jam
Makes approximately 2 large jars or 4 small.
Adapted from BBC Good Food.

Note: If making as a gift, be sure to label the jars with the date and storage instructions. 

9 fresh red chillies, roughly chopped
7 red bell peppers, deseeded and roughly chopped
8 garlic cloves
400g can cherry tomatoes (use regular chopped tomatoes if you can't find cherry)
700g castor sugar
200ml red wine vinegar
1 tsp salt

Place the red pepper, chillies (with seeds) and garlic cloves into a food processor and pulse until finely chopped.
Scrape the mixture into a heavy bottomed pan with the cherry tomatoes, castor sugar, vinegar and salt.  Bring the mixture to a boil and then reduce heat and simmer for 1-2 hours, stirring frequently.

When the jam becomes very thick and sticky, remove from the heat and cool slightly.  The mixture will thicken more as it cools. If the jam is taking longer to thicken, try increasing the heat for the last 20 minutes or so while keeping a close eye and stirring regularly.
Pour the jam into sterilized jars and store in a cool dark place for 3-6 months. Refrigerate once opened.


November 21, 2010

Kartoffelpuffer (German Potato Pancakes)

Something wonderful happened last week....

My kitchen arrived! And these German potato pancakes, otherwise known as Kartoffelpuffer, were one of the many recipes I couldn't wait to make.

My first encounter with these crispy treats was in a cosy German restaurant that has since become a favourite of mine. They were served fresh out of the pan with a delicious apple sauce and were accompanied by a nice tall glass of Hefeweizen. The perfect combination, if you ask me!

Kartoffelpuffer are typically made of raw grated potato and onion, flour, eggs and seasoning. They are known and loved throughout Germany and are prepared in various ways from region to region. In the Rhineland they are sometimes eaten with buttered Schwarzbrot (Black Bread). In Bavaria they are typically served with sauerkraut. Other regional variations include Kartoffelpuffer with sugar and cinnamon or smoked salmon and creme fraiche. Though it seems that most Germans favour the more traditional variation: Kartoffelpuffer with apple sauce.

As you can tell, these pancakes are incredibly versatile. Last night I topped some leftover cakes with crispy bacon and fresh avocado. Delicious!

I'd imagine they'd also be good made with butternut squash, sweet potato, leeks, carrots or zucchini. The possibilities are endless.

Below is a typical yet tasty recipe for Kartoffelpuffer. Feel free to experiment with ingredients such as bacon, chives, garlic, chilli flakes or any of the ingredients mentioned above.


Guten Appetit!

Serves 4-6

1 kg starchy potatoes, peeled and rinsed
1 large onion
1/3 cup flour
2 eggs
1-1/2 tsp sea salt
1/2 tsp dried thyme
Black pepper to taste
Vegetable or Canola oil for frying

Grate the potatoes using a food processor or box grater. Put the grated potato into a clean dish towel or some cheesecloth and squeeze out as much excess liquid as possible. Transfer the potato to a large mixing bowl.

Peel and grate the onion and add to the potatoes.

In a separate bowl, mix together the flour, eggs, salt, pepper and thyme. Add to the potato mixture and stir well to combine.

Heat a large frying pan with 3-4 tbls oil. Add a spoonful of the potato mixture to the hot oil and flatten down with a spatula. Cook 3-4 pancakes at a time, turning once until golden and crisp.


Serve with apple sauce if desired.

October 21, 2010

And Just like that, It was Autumn.

As I sit here, at my living room window, watching the beautiful Autumn leaves float almost weightlessly to the ground, I'm finding it hard to believe that it's Fall already. Has it really been that long?

The last eight months here in Germany have been an adventure. At times difficult; however, like all good adventures, rewarding. Neither me nor my husband were expecting some of the difficulties we encountered but the experience so far has undoubtedly made us stronger and more patient.

Our original plan was to purchase a home here in Germany. A process that soon became nightmarish. Not impossible, but dreadful none the less. After two months of visiting numerous banks and viewing multiple homes, we eventually found a house and a bank that was willing to finance it.

The home was exactly what we were looking for. We absolutely loved it. Maybe too much.

Two days before we were scheduled to sign the contract, the owner of the home sold it to someone else.

This was bad. Real bad!

We had spent three whole months focusing on and prepping for a home we believed would soon be ours. Add those to the two months we spent finding the home and we had been here almost half a year and were still living in a hotel. I was frustrated, angry and completely exhausted.

We were back to square one with the beautiful summer slipping thru our grasp. We decided to clear our heads and visited my home town, by the sea, for two wonderful weeks.

Upon our return to Germany, we let a little part of our German dream die, and decided to rent.

This process was also difficult, but with the help of a great immobelien (real estate agent) our perseverance soon paid off. We've been in our new apartment now for three weeks. We are just around the corner from being settled and it feels so good.

One of the things we were surprised to find when looking at apartments in Germany is that very few of them have fitted kitchens! In cases like these, it is the renters responsibility to install one. With the help of a few new German friends we managed to install an "emergency" kitchen while our new one is being made. The kitchen will arrive in November and I am so excited I could pop!

So, if it wasn't for some great people, good beer (though it has been a while), delicious sausages, amazing breads and an endless variety of tasty mustards, it would have been a very long and arduous journey thus far.

More about German culinary goodness in the next post!

For now though, I want to thank you all for sticking by me through this difficult transition. Your patience and support has meant a lot and I can't thank you enough.

Oh, and one last thing...I am currently working on a very special creation! It's been baking for almost seven months and will be ready sometime in January! I have a feeling it will be scrumptious! ;-)

More soon....

February 15, 2010

A New Chapter!

More specifically, a new home in a new country.

There's one problem though; these changes will require my absence for a short while.

To explain the situation better, I have answered a few questions that I thought some of you may have. Sort of like an anticipatory FAQ :)

Here goes...


Q: Why are you leaving Washington DC? I thought you liked it here?

A: I do like DC and I'm going to miss it very much. However, an exciting opportunity has come up in Europe for my husband and I.

Q: Europe? Where?

A: The German state of Baden-Württemberg. Neither me or my husband have lived in Germany before, so this a big first for both of us!

Q: When do you leave?

A: We were supposed to be leaving today! However, due to complications caused by the recent snowstorm, we will now be leaving next week.

Q: What do you mean by absent? Are you going to abandon your blog?

A: NO! Not at all! Well maybe for a little while. Here's the thing:

The entire contents of my kitchen, along with the rest of our stuff, are packed and will soon be making their way across the Atlantic ocean. We have been told the shipment could take up to 90 days to arrive! During that time, we will be searching for somewhere to live. This is where the possibility of a temporarily neglected blog comes in. I won't have the equipment I need to cook until we find a home and our belongings have arrived. All I'll have is a suitcase full of clothes, my laptop, my camera equipment and my husband.

Q: So you might not be able to cook for three months?

A: Nope. Unless our stuff arrives sooner and we find a home quicker than expected. Or perhaps the hotel we stay in let's me use their kitchen ... unlikely! :)

Q: Are you going to miss cooking?

A: Definitely! Don't get me wrong, I love to eat out. Especially in different countries, but not every single day for 3 months! No doubt I'll enjoy local food and hotel room service for a while. But before long, I'll be begging for the day our stuff arrives and my new kitchen is up and running!

Q: Will you keep us updated?

A: Absolutely! As often as I can. I have recently set up a Facebook page that I will update frequently. I'll fill you in on all the German / European cuisine I come across. I'll visit farmers markets, cafés, restaurants and vineyards. And when we're settled I plan to explore the culinary wonders and delights that all of Europe has to offer. Paris and Rome here I come! :)
My camera and I will share these adventures with you every step of the way.


Thank you for listening, for your support and your understanding. I'll catch up with you all soon.

Goodbye for now.

Jennie

February 4, 2010

Chocolate Fondant Puddings

Have you ever had one of those days where you'll do just about anything to satisfy a craving? Not just any craving but a ridiculously chocolaty one.

For me, that day was yesterday. I wanted the tastiest, gooiest, chocolatiest thing I could think of. And Chocolate Fondant Puddings seemed like the right way to go.

These decadent desserts go by several different names. Some of you may know them as Chocolate Lava Cakes or Molten Chocolate Cakes. They are easy to make and versatile. A splash of Bailey's Irish Cream, Cointreau or some finely grated orange zest are all wonderful additions. They are great for dinner parties and celebrations. And they would certainly sweeten up that special someone. Your Valentine perhaps?!


So go on, let your hair down. Indulge your taste buds in the chocolatiest way possible!


Chocolate Fondant Puddings
Serves 8, Makes 9

Note: This recipe yields an extra serving to allow for errors and to determine cooking time. They can be made and frozen up to 1 month in advance. Allow an extra 5 minutes of cooking time if baking from frozen. Halve the recipe if you wish, or keep the extras for another time.

200g good quality bittersweet chocolate, chopped into pieces
200g butter, cut into pieces
200g caster sugar (superfine)
200g plain flour
4 eggs plus 4 yolks
50g melted butter for brushing
Cocoa powder for dusting
9 small ramekins

First off prepare your ramekins. Brush the entire inside of each one generously with the melted butter and then refrigerate or freeze. Brush more melted butter over the chilled ramekins, then, with one ramekin at a time, add a spoonful of cocoa powder. Tilt and turn the ramekin so the powder completely coats the butter. Tap out any excess powder and repeat with the remaining ramekins.

Slowly melt the chocolate and butter together in a bowl over a pan of gentle simmering water. Remove from the heat and stir until smooth. Set aside to cool.


Using a separate bowl, whisk the eggs, egg yolks and sugar together until thick and pale. Sift in the flour and beat to combine.

Gradually pour the melted chocolate into the egg mixture, stirring thoroughly as you go. Keep mixing until you achieve a loose cake batter.

Divide the chocolate batter evenly between each ramekin. Chill for at least 30 minutes, or freeze for up to one month. Add an extra five minutes to the cooking time below if baking from frozen.

Preheat oven to 400F. Place ramekins on a baking tray and bake for 10-12 minutes until the tops form a crust and the cakes begin to separate from the sides. Be careful not to overcook them as the runny chocolate center is essential. Remove from the oven and leave to rest for one minute. Gently tip the pudding out of the ramekin onto a plate. Serve with fresh berries and vanilla ice cream.

Recipe adapted ever so slightly from recipezaar.

January 25, 2010

Bubble & Squeak Cakes with Tomatoes & Poached Eggs

Bubble and what?...You've gotta give it to us Brits. We certainly know how to name our dishes! Spotted Dick, Toad in the Hole, Bangers and Mash, Bubble and Squeak! I don't understand this silliness any more than the next person, but I do love it.

This traditional English dish is made up of several different vegetables, typically leftover from a Sunday roast. Taking a mixture of any cooked vegetable, mashing it up, and pan frying it until golden will qualify as Bubble and Squeak. Traditionally though, potatoes, onions, cabbage or sprouts are used.

I like to mold my bubble and squeak into little cakes and serve them with a nice poached egg on top. The occasional piece of crispy bacon is also a welcomed addition!

Instead of making individual cakes, you can make one big portion if you prefer. Just pat the mashed vegetables into a pan heated with olive oil and fry until golden and crisp.

Feel free to experiment with leftover vegetables such as squash, sweet potatoes, parsnips or swede. And remember... watch out for the bubbles and listen carefully for the squeaks!

Makes 4 cakes (serves 2)

Note: These cakes can be made from scratch or you can use leftover cooked vegetables.

For the Bubble and Squeak:
1lb potatoes, peeled, cooked and mashed with a tablespoon or two of butter
1/2lb Brussels sprouts, cooked and roughly chopped
1 onion, chopped
1/4 cup seasoned flour
Butter
Olive oil for frying

To Serve:
2 eggs (optional)
Cherry tomatoes on the vine (optional)

In a large bowl, roughly mix together the potatoes and Brussels sprouts.
Melt a knob of butter in a pan and cook the onion until really soft and beginning to brown. Mix with the potatoes and sprouts and season generously with salt and black pepper. Form the mixture into cakes and chill until firm for 1 hour or for up to 24 hours. Coat each cake in the seasoned flour. Heat a generous amount of olive oil in a large pan and fry the cakes until golden and crisp on both sides. At the same time, poach the eggs and grill the tomatoes. Place the tomatoes on a baking tray, drizzle with a little olive oil and season with salt and pepper. Grill (broil) until they begin to soften and blister. About 3-4 minutes. Top two cakes with a well drained poached egg and serve with the grilled cherry tomatoes.

January 18, 2010

World's Best Baked Onions

"I've found it. The best onion recipe—it's smashing, pukka, the absolute dog's kahunas! I love it served with cod, but it's also great with roast chicken. You've got to try it."

Above were Jamie Oliver's exact words when describing these onions in the cookbook 'Happy Days with the Naked Chef '. And the man wasn't kidding! These really are the worlds best onions!

I received the Happy Days cookbook back in 2002, shortly after it was published. It's one of Jamie's earlier books and probably the first decent cookbook I owned. Since then, I have made these onions many times. The original recipe consists of onions, double cream (heavy cream), Parmesan, garlic and rosemary. However, I often take advantage of their versatility by tweaking them here and there. For example, I like to add finely chopped mushrooms to the the cream as they offer a bit of texture and tremendous flavour to the filling. Also, I sometimes replace the Parmesan with blue cheese when serving them with steak. Another variation I like, is to top the onions with some breadcrumbs mixed with freshly chopped thyme. Delicious!

Today I have prepared them with the addition of finely chopped mushrooms, a mix of both light and double cream, and a little extra garlic.

If you're looking for a recipe that is decadent, delicious or 'the absolute dog's kahunas' as Jamie Oliver so eloquently put's it, then try this one, you won't be disappointed!

Serves 4

4 tennis-ball-sized white onions, peeled
3/4 cup finely chopped mushrooms
3 medium garlic cloves, finely chopped
2 tsp freshly chopped rosemary
8-9 tbls double (heavy) cream. You can also use light cream or a mixture of both
4 slices of pancetta or streaky bacon
A few good handfuls of grated Parmesan cheese, plus a little extra for topping


Note: In the book, Jamie boils the onions but I prefer to steam them. Steaming takes a bit longer but the onions will be more crisp.

Boil the onions for 15 minutes or steam for about 25. The onions need to be slightly tender.
Remove from the pan and set aside to cool. With a sharp knife cut an inch off the stem end of each onion. Then, cut about a heaping tablespoon out of the inside of each onion being sure to leave the outer layers intact. Finely chop and set aside for the filling.

Preheat oven to 400F. Wrap each hollowed onion with a slice of pancetta or bacon and secure with a sharpened sprig of rosemary if desired.

Heat a little olive oil in a pan. Add reserved chopped onion, garlic, mushrooms and rosemary. Cook for a few minutes until softened. Add cream and remove from the heat. Stir in the Parmesan and season with salt and pepper.

Place onions onto a roasting tray and spoon some of the cream mixture into each one. Sprinkle with a little Parmesan and bake for about 25-30 minutes until tender, depending on the size of the onions.

Recipe adapted from 'Happy Days with the Naked Chef' by Jamie Oliver.

January 12, 2010

Roasted Beetroot Soup

Beetroot. There was a time when the mere thought of eating it would make me shudder. This aversion was doubtlessly associated with the pickled horrors of my youth ... thick slices of soft, slimy, vinegary beetroot. Yuck.

However, after a recent and successful bid to forgive foods that in my earlier days were labeled inedible, I decided to make an "All" beetroot dish! A fresh, vibrant, sexy, beetroot soup.

This soup is healthy, wholesome and satisfying. The perfect combination for a winter warming dish. It is also wonderfully refreshing when served chilled in the summertime.

Like most vegetables, beetroot benefits from roasting, intensifying it's sweet and earthy flavour. The tangy creme fraiche pairs fabulously with the naturally sweet beetroot.

This recipe is so simple and can be made up to two days in advance. Roasting the beetroot ahead of time will make it even easier.

Serves 4

4-5 medium to large beetroot, trimmed and scrubbed
1 large onion, chopped
1 carrot, chopped
1 large garlic clove, crushed
1 sprig fresh thyme
1 large bay leaf
4-5 cups hot chicken or vegetable stock
3 tbls or more of whipping cream
Creme fraiche or sour cream to serve

Preheat oven to 400F. Wrap each beetroot individually in tin foil and cook for one hour until tender. Insert a knife or toothpick into the center to check. Allow to cool. Using gloves, pinch the skin to remove. It should come off with little resistance. Chop beetroot into bite size pieces.

Meanwhile, heat a few tbls of butter in large pan. Add onion and carrot and cook until softened, about 7 minutes. Add garlic and cook for a further 30 seconds or so. Add the bay leaf, thyme and 4 cups of chicken stock to the pan. Bring to a boil, then cover and simmer for 20-25 minutes.

Add the cooked beetroot pieces to to the pan, stir and remove from the heat. The goal here is not to overcook the beetroot in order to retain its vibrancy. Allow mixture to cool. Once cooled, discard thyme sprig and bay leaf. Transfer mixture to a food processor and blend until smooth. The soup should be thick but not too thick. Gradually add the leftover cup of hot stock if needs be. Reheat soup over a medium-low heat and slowly stir in the cream. Season to taste with salt and pepper. Serve with creme fraiche or sour cream.

January 3, 2010

Vegetarian California Rolls

New Year's Resolution # 6: Make More Sushi!

After traveling around Japan, I developed a love for Sushi. Well, almost all Japanese food actually. You may be surprised to know; however, that the "California Roll" is named that for a reason. It was born in California. Ichiro Mashita, a sushi chef at the Tokyo Kaikan restaurant in LA invented the rolls in the early 1970's.

Traditionally, California Rolls consist of avocado, cucumber and crab meat. However, if you're like me and aren't a huge fan of spider-like crustaceans, I recommend trying this vegetarian version of the California Roll. Alternatively, you could use imitation crab meat or cooked shrimp in place of the crab.

Getting sushi rice right can be a challenge. I've gone through my fair share of it in attempts to master the art. Rice vinegar, sugar and salt is a mixture referred to as Awase-zu and is the seasoning added to cooked sushi rice. Finding the right ratio between these simple ingredients is key. Also, it is very important to properly wash, rinse and drain the rice which in turn can seem tedious and time consuming, but essential for good results. I guarantee, once you get the hang of it, your kitchen will become your new "sushi place"!


I hope everyone had great New Year!

I leave you with a picture of me dressed as a Geisha in Kyoto, Japan. A beautiful city that I hope to return to one day.


Makes approximately 5 Rolls (between 35 and 40 pieces)

Note: I highly recommend using a rice cooker to make sushi rice as it produces the best results at the click of a button.

For the rice:
3 cups raw sushi rice
3 1/4 cups water
1/3 cup plain rice vinegar
2 tbls superfine (caster) sugar
1 tsp salt

For the filling:
5 toasted nori sheets
1-2 avocados, peeled, pitted and sliced
1 English cucumber, cut into long spears
1-2 carrots, peeled and julienned
About 1 tbls each of black and white sesame seeds
Cooked shrimp or crab (optional)

Equipment:
Rice cooker
Bamboo rolling mat
Wooden rice paddle

Place rice into a large bowl and fill with cold water. Stir briskly with your hands and pour away the cloudy water. Repeat this process 5 or 6 more times or until the water runs clear. Next, drain the rice in a colander for about 30 minutes.

Once the rice is drained, tip into a rice cooker and set to cook. Once the cooker bleeps, let the rice sit for a further 5 to 10 minutes.

Place the vinegar, sugar and salt in a saucepan and bring to a gentle simmer. Remove from the heat and allow to cool.

Place the hot rice into a large, shallow, nonmetallic bowl. I use a large baking dish. Spread out the rice and slowly add the vinegar mixture. While adding the vinegar mixture, mix the rice with a wooden paddle using quick cutting strokes. While mixing the rice in a slicing motion you will need to fan it with your other hand. I use a large circular lid to do this. Fanning will cool the rice and help it to produce a wonderful glossy shine.


Cover the rolling mat completely with cling film (plastic wrap). This makes the mat easier to clean.
Lay one nori sheet onto the rolling mat. Using wet hands, evenly spread a portion of the rice over the nori sheet, leaving 3/4 inch visible at the end furthest away from you. Sprinkle with black and white sesame seeds and carefully turn the sheet over. Place the cucumber, carrot and avocado in the center of the sheet. At the base of the mat, start to roll over the ingredients, pressing firmly as you go. Once you have formed a log shape, lift up mat and apply gentle pressure back and forth to ensure the roll is firmly molded.

Using a very sharp, wet knife, trim the ends of the roll and cut into thick slices. Repeat process with the remaining nori sheets and ingredients. Serve with soy sauce, pickled ginger and wasabi.