November 18, 2011

Clementine Tarts with Chocolate & Physalis

Clementine Tarts with Chocolate & Physalis
I don't make dessert very often, so when I do, I like it to be special. Something that's worth the effort and calories.  And today's dessert is just that, only it's lacking in effort and calories.  Score!

Here's what we have: A rich and creamy filling consisting of quark, creme fraiche and sweetened condensed milk, flavored with the juice and zest of seasonal Clementines, nestled in a buttery biscuit (cookie) style crust. Sort of like a cheesecake, if you will.

Quark is a soft cheese, slightly tangy in flavour with a texture that is somewhere between thick yogurt and cream cheese.  It is very popular in Germany and Eastern Europe and is used in everything from dips and pasta to cakes and crepes.  It naturally has a very low fat content, making it a healthy alternative to cream cheese.

The addition of sweetened condensed milk in this recipe adds extra creaminess as well as sweetness to the tarts, eliminating the need for additional sugar.  A rich, dark chocolate drizzle adds a touch of bitter sweet and a chocolate covered Physalis lends a wonderfully elegant touch.


IMG_3946n


Clementine Tarts with Chocolate & Physalis
Makes 4-6 (depending on the size of your tart pans)
Note: I used some oaty German biscuits for the tart crust, similar to Hobnobs, but really any plain biscuit will do.  For best results, chill tarts overnight.

200g biscuits (cookies) such as Graham crackers, Digestives or Hobnobs
50g butter, melted
250g quark
150g creme fraiche
1 can sweetened condensed milk
Finely grated zest and juice of one large Clementine
4-5 squares of good quality dark chocolate
6 Physalis (Cape Gooseberries)

Preheat oven to 350F/175C

Pulse the biscuits in a food processor until finely ground. Pour in melted butter and pulse to moisten.  Firmly press the biscuit mixture into the base and sides of individual loose-bottomed tart pans.  Bake in the oven for about 5 mins, then cool while you make the filling.

Clean the blade and bowl of the food processor.  Add the quark and blend for 5 seconds or so, add the sweetened condensed milk, clementine juice and zest and blend for a few seconds more.  Add the creme fraiche and blend until smooth and creamy. The mixture will be quite runny at this point, but it will set once it's baked.

Pour the cream mixture into the tart pans and bake in preheated oven at 350F/175C for 5-7 minutes. Be sure NOT to brown.  Leave to cool.  Melt the chocolate in a small bowl over a pan of simmering water.  Pour into a piping bag or small freezer bag and snip off the end.  Drizzle onto the tarts then top each with a chocolate dipped Physalis.  Refrigerate for at least 6 hours, preferably overnight.
November 7, 2011

Warm Sausage, Sweet Potato & Puy Lentil Salad

Warm Sausage, Sweet Potato & Puy Lentil Salad
I love Autumn.  The beautiful crisp air and rich, golden colours.  The earthy scent of fallen leaves. The comfy boots and chunky knits.  The irresistible pumpkin spice lattes.  The alluring smell of cinnamon, nutmeg and freshly baked apples...

This season has my name written all over it, at least until Spring arrives anyway.

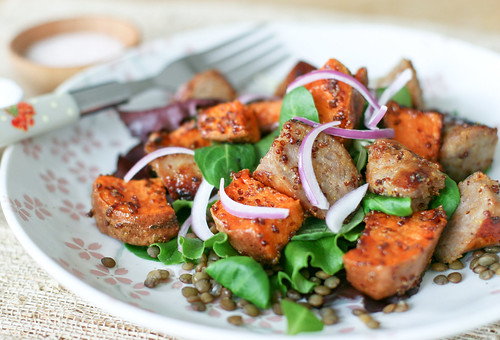
I think today's dish captures the essence of Autumn wonderfully.  Earthy Puy lentils, honey-mustard glazed pork sausages, roasted sweet potatoes, and crisp red onion - complimented by a light and tangy balsamic vinaigrette.  Comforting.  Hearty.  Delicious.

It has to be said that quality ingredients are key here. Choosing the best sausages you can find will really make a difference.  I recommend a meaty Cumberland or Toulouse style sausage.  As for lentils, the Puy variety are the way to go.

Feel free to substitute pumpkin or butternut squash for sweet potato, they are equally delicious.  Enjoy!

Warm Sausage, Sweet Potato & Puy Lentil Salad
Serves 3-4
1 large sweet potato, cut into triangular wedges (or substitute 1 small-medium peeled seeded butternut squash or pumpkin)
150g Puy lentils
1 Bay leaf
6 good quality pork sausages
1 red onion, finely sliced
4 handfuls salad greens such as lamb's lettuce or baby spinach
2 tbls runny honey
2 tbls wholegrain mustard
Olive oil
Salt & black pepper

Dressing
4 tbls extra virgin olive oil
2 tbls balsamic vinegar
A few good pinches sea salt
A good pinch or two of sugar

Preheat oven to 200C/400F.  Place the sweet potatoes on a roasting tray.  Drizzle with a little olive oil and season with salt and pepper.  Roast for 25-30 minutes or until tender.  While the potatoes are cooking, prepare the sausages and lentils.  Tip the lentils into a saucepan and cover generously with water or stock.  (The water will need to be at least 1 inch above the lentils). Add the bay leaf and bring to a boil. Lower heat and simmer, covered for about 20 minutes or until al dente.  Drain the lentils, then drizzle with a little olive oil and season if necessary.

Heat a tablespoon of olive oil in a frying pan over medium heat and cook the sausages, turning frequently, until golden and cooked through. Set aside to cool slightly. Once cooled, cut at an angle into thick slices.

Mix together the mustard and honey and set aside.  Whisk all dressing ingredients together, then taste and season to your liking.

When the sweet potatoes are soft and golden remove from the oven. Add the sausage slices to the pan and gently toss the potatoes and sausages with the honey/mustard mixture.  Return to the oven for a further 5 minutes or until everything becomes deliciously sticky.

Layer plates or bowls with salad greens, lentils and the sausages and potatoes.  Top with thinly sliced red onion and drizzle with balsamic dressing.

October 30, 2011

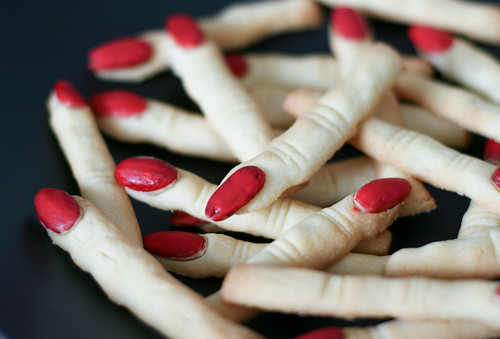
Freaky Fingers

IMG_3857-2
Boo! I've been a ghost lately but since it's Halloween I figured I should stop by and scare up some fun with these creepy cookies. These delectable digits may look ghastly, but they really are freakishly good! Go ahead and give your guests the finger this Halloween! You won't regret it! ; )

Freaky Fingers
Makes 20-30 fingers

200g all purpose flour
100g caster sugar (superfine)
100g butter
1 egg yolk (maybe 2)
1/2 tsp vanilla extract
20-30 blanched almonds
Red food colouring (paste is best)
Small clean paintbrush

A few notes: The fingers will spread in the oven so be sure to roll them quite thin.  Also, if a few of the almonds fall off after baking, try gluing them them back on with the red colouring paste. 

Place the first 5 ingredients in a food processor with a pinch of salt and whiz until a ball of dough forms.  If the dough isn't coming together, add another egg yolk. Tear off a piece of dough, slightly smaller than a golf ball, and roll into skinny cylinders.  Place on a baking sheet lined with parchment paper - not too close together as they will spread during baking. Place an almond on the end of each finger and trim away any excess dough to neaten.  Use a knife to make a few lines for the knuckles.  Place in the fridge for 30 minutes.  Heat oven to 180C/350F then bake until just firm, about 10-12 minutes, maybe less if you're fingers are thin.  Just be sure to keep a close eye.  Leave to cool a little, then paint each almond with red food colouring.

Recipe from BBC Good Food

July 4, 2011

June 23, 2011

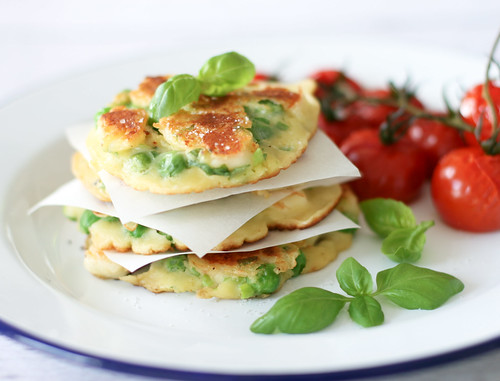
Fresh Pea, Basil and Halloumi Fritters

IMG_9214N
For the last few weeks, my husband and I have had the luxury of sleeping for seven (sometimes eight) whole, uninterrupted hours a night.  Our little boy has finally established a regular sleeping pattern and it feels amazing.

The transition into parenthood was harder than we anticipated.  We had been assured by our experienced family and friends that "things get easier" and "sleepless nights don't last forever" but until recently, we were understandably skeptical.  Post baby was definitely harder than pre baby.  Then one day, like magic, we knew what we were doing.  We had become parents.  Pros' in fact.  The new normal had arrived and with Summer right around the corner, it was just in time.

Summer in Germany means mid-80 degree days and warm evenings.  Still fairly hot for us English, but a far cry from the 100 degree Summers of Washington DC.

Lately, we've been taking advantage of the lovely weather and enjoying our meals outside.  Sometimes we walk to the park, lay down a blanket, open a bottle and dine European style.  Bread, olives, cheese and wine, combined with a little people watching, make for a tasty and relaxing treat.


IMG_8961-3


For those of you enjoying your warm days dining under the sun, this recipe is for you.  Either just out of the pan or just out of the picnic basket, these Pea, Basil and Halloumi Fritters are delicious.  Serve them hot with roasted cherry tomatoes for a light dinner.  Or eat cold leftover fritters with sweet chilli jam and salad for a tasty lunch.


IMG_9024-3


I'd like to thank you all for your patience during my absence.  It feels great to be back.  And I can't wait to share more deliciousness!


IMG_8977-2


Pea, Basil & Halloumi Fritters
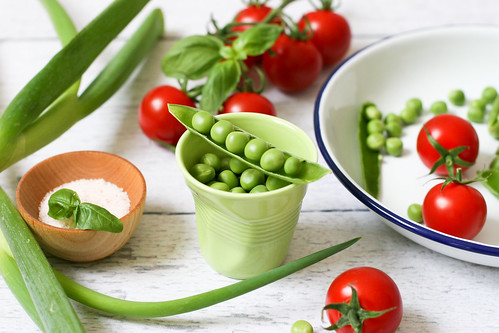
Fresh peas are a wonderful component to this dish; however, they are not essential.  If they are not available to you or you're simply short on time, frozen peas work just as well.


100g all purpose flour
1 tsp baking powder
160 ml (2/3 cup) milk
1 egg
120g (3/4 cup) fresh or frozen peas
2 large spring onions, finely chopped
250g halloumi cheese, cut into 1cm cubes
Large handful of fresh basil, roughly chopped
Generous sprinkling red chili flakes
Salt & black pepper
Olive oil

Boil the peas for 2 minutes (only cook for 30 seconds or so if frozen) then drain and refresh under cold water.
In a large bowl, combine the flour, baking powder, egg and milk and whisk to make a smooth batter.
Season the batter with salt, red chili flakes and plenty of black pepper.  Then add the remaining ingredients and mix well.
Heat a little olive oil in a large non stick pan over medium-high heat.  Drop spoonfuls of the mixture into the pan and cook in batches for 2-3 minutes each side.  Drain on paper towels and sprinkle with sea salt if desired.

Makes approximately 12 fritters.

January 22, 2011

The Sweetest Thing I Ever Baked....

IMG_8392-2IMG_8433


Introducing 7 pounds and 1 ounce of pure deliciousness...

Miles Calder.

Our beautiful baby boy.

Born January 8th 2011 at 9:43pm.

I'll be back with recipes and more just as soon as I return from cloud number nine....